I recently heard a comment made in our shop about a piece of custom furniture we were building for a client. The gist of the comment was simply that most of what we build seems out of date. This is a highly subjective opinion, one I wouldn't normally consider responding too except I've heard it from other people as well.
At Goodwin, we're always trying to find new and innovative ways to do our job while at the same time creating fresh and exciting products. We look forward to challenging jobs from smart clients who want to push boundaries and make something interesting. And quite frankly, we pride ourselves on our innovation and ability to stay at the forefront of our industry.
But it's also true we build a lot of custom furniture and cabinets that aren't considered modern or innovative.
Cabinetry and woodworking in general tends to have an old-fashioned look; but with so many alternate materials one can use to build, wood often seems like an unnecessary expensive option. The more inexpensive boxes you can buy at places like Home Depot or even Target are made from plastics or wood substitute materials. Many don't even bother to use a wood facade. The status of a true woodworking has been somewhat replaced by these alternative types of furniture and cabinetry. These are mostly known as composite materials.
To understand the differences between composite materials you need to know the differences between hardwood and softwood. Hardwood comes from deciduous trees, (or trees whose leaves fall off in Autumn) and softwood (which comes from evergreens). Both hardwood and softwood plywoods are often used as the core material for cabinets. The hardwood is generally considered the higher quality of the two. The softwoods do sometimes feature an overlay that strengthens it and will make it suitable for cabinet construction, although it is more often used for smaller things like furniture. You'll see it a lot in big box stores selling coffee tables, entertainment centers or desks you assemble yourself.
Composite metal and plastics are also competing for your money. Often cheaper than wood, easier to paint and more simple to fabricate exact shapes, these mediums are becoming more and more popular with the small end furniture market. Certain Chinese manufacturers are even using similar substances to resin and silicone to create pieces. These items are then painted or distressed to resemble materials like metal or wood. Even so, the biggest threat to wood is the wood composite.
There are different grades of hardwood and softwood composites out there. MDF and Particleboard being two of them. These pressed woods are quite popular with the current trend of paint-grade cabinetry or they can have a colored veneer on the side giving it a finished look before it's even shaped or assembled. They allow for a smoother look and can be just as sturdy and durable as regular wood. They are also less likely to warp.
Right now, one of the biggest trends in cabinetry is in the finish. Many of our buyers are choosing paint finishes over natural wood stain or glazing. They are also opting for cleaner, more simple lines. Flat panel doors are making a huge comeback. The benefit to choosing cabinets of this nature is color. There are more color options in paint grade than there are with stain. Designers can successfully create a fluid color scheme throughout a house by using paint grade to generate highly specific colors.
However, there is a certain status that comes along with wood. It's a staple of the antique furniture community and there's definitely a prestige that is associated with having solid wood pieces. Because of that, solid wood pieces continue to fascinate our clients.
It all comes down to the simple fact that we do what our clients want. If they want a wood dining table, rest assured, we're going to build it. If they want oak, walnut, alder, cherry or any other wood species cabinetry, we're going to do it. After all, our focus is helping our clients achieve their visions when we build products for them. If that vision is modern and progressive, than we're gonna do it. If that vision is more reflective and old fashioned, we're gonna do that.
Ultimately, I think what defines something as modern these days is the accents. A good designer can take some antique with the right lighting and accents, it can look new and vital.
We want to be the tools our clients use to make their dreams come to life. Of course we want you to call Goodwin today and find out exactly how we can help you!
Showing posts with label Cabinet Design Service. Show all posts
Thursday, January 29, 2015
Monday, December 8, 2014
THIS IS HOW YOU DESIGN A KITCHEN....
Goodwin Mill and Cabinet here and today we're taking you on an in depth look at the steps a cabinet designer goes through to create cabinets in your new home. So sit down for a bit, browse the pics below and read all about how cabinets are designed!
The very first thing you need is a blueprint. A plan. This particular plan was loaded will all kinds of instructions, but we've edited out all of them and left only information that is important to the design behind. The plans give us a lot of information we need when we start designing. It tells us where the appliances need to go and what kinds of appliances are going to be in that kitchen. For example, this kitchen calls for a sub-zero refrigerator. The standard size for home refrigerators is 36". This one is calling for a 48" space so we know it's a sub-zero. We also know roughly where other things like plugs and pipes are going to go because of where the architect puts the sinks, etc. etc.
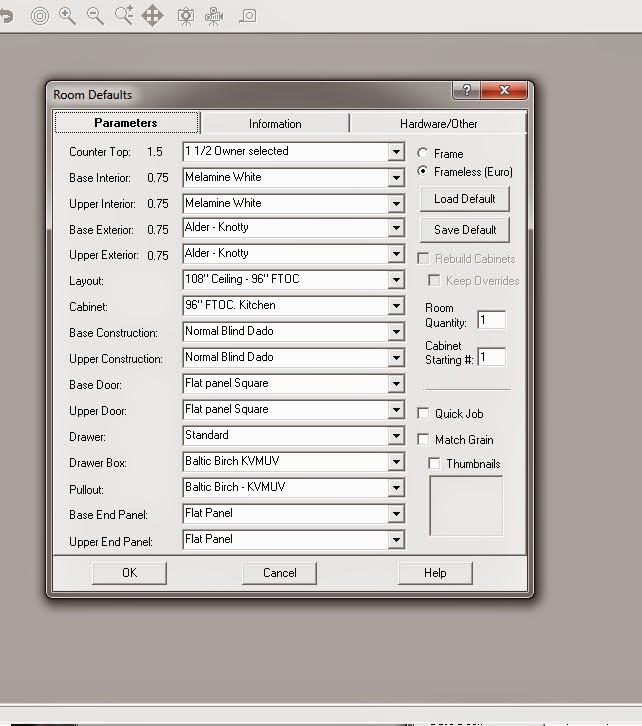
We're ready to begin. So after opening our cabinet design software, we immediately open a new room for editing and specify all of the parameters we can. For example, the owners of this home have chosen to use knotty alder wood for their cabinets. You can see some of the other details as well. At this point, we want to get as much information entered as possible. If the buyer has picked out a stain and finish color, we can enter that here. If they've picked handles and knobs we can add those as well.
Next, we need to identify which walls we're going to reproduce and do a rough outline of the work space. we know which walls we need to reproduce based on which walls are supporting cabinets. In this kitchen there are three with an additional island wall we will have to build. I've used red arrows to point to the walls we need to duplicate in our design and I've set up three walls that roughly resemble the walls we need.
Now that we've made the rough figure, it's time to get technical. Using a ruler and the blueprint scale, we determine the exact length of each wall and we edit our drawing to reflect it. This is also the time we add anything in the wall that could conflict with cabinets; such as windows, doors, etc. etc. Of these three walls, only one has a doorway. We've identified it on the plan and added it to our drawing. Right now, our drawing reflects the architects exact design of the space. Keep in mind, once the home is built, we may have to adjust some of our figures. Framed walls don't always end up exactly the same length as they do on the plan. We need to be able to adjust for real space before we start building the cabinets.
There is a fourth wall in this kitchen and using the dimensions specified on the plan, we can plot out where that wall will go. In this next picture, you can see the island wall is added. Once again, using a ruler and the scale from the blueprint, we took one point on the island and measured the distance from it to the two closest walls. In the case of this house, the south and west walls. Where those two points connected is where the starting point of our island will be set. So now we have every surface we plan to build on represented in the drawing.
The next step involves a lot of the same activity we've done so far. The next step is adding the appliances. Since appliances; like windows and doorways, can conflict with a cabinet design, we need to map them out before we go any further. This kitchen has four appliance spaces. A dishwasher, a sub-zero fridge, a cook top and a cabinet designed to stack double ovens with an additional microwave. We add the appliances and now we can see where the cabinets will go and what they will be next to.
And now the fun really begins! At this point, we need to fill the space allotted for cabinetry. We run basic base cabinets along the walls and then do the same with the uppers. Now our kitchen is loaded up. We have a visual representation of the space and how we will fill it. It's important to understand two things at this point... 1) This drawing generates a cut list for each cabinet. Therefore, the drawing helps us tell how much each cabinet will cost in materials. It will generate a figure for a bid. 2) We will re-design it at least three more times before we have our kitchen. The first time is now. We will pull up each elevation and adjust it to make it more functional. The second time is when we meet with the client. They will go over the design and we will change it to reflect their desires. Perhaps they want less or more drawers, or maybe they want to add a mini-fridge. Whatever they choose, we will change it to reflect their wishes. The last time is when we get a field measurement of the space. We will adjust our drawing to reflect the true numbers. This step won't require redesigning, but it can drastically alter your cabinets sizes and cutting list.

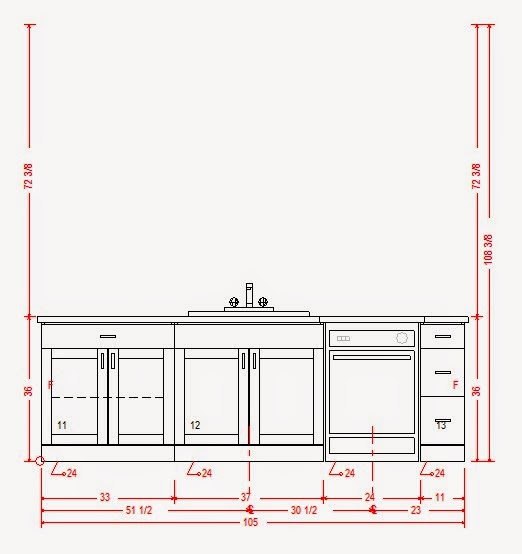
This is an example of quick basic design. This wall is the island wall. The dishwasher prevents us from having a meaningful cabinet on the end. These other two can be similar, but the cabinet in the middle is a sink cabinet and calling for a 36" sink. Therefore, the middle cabinet needs to be the biggest. One basic rule of design is to create a functional space. We try and include at least one drawer bank in a kitchen. The middle cabinet will be a sink cabinet and the final cabinet can be pretty much whatever we want. For now, we'll leave it as a standard drawer/door cabinet.
This pic shows the same wall after we've done some simple design work. We took the small cabinet farthest right and turned it into a drawer bank. We made the middle cabinet the largest on the wall, drew in a 36" sink to make sure it would fit and left that cabinet a simple door/drawer combo. We jazzed up the design, made it more functional, kept the appliance where it needed to be according to the blue prints and overall, improved its appearance. All of that with just a few simple changes. But we're not done with the island just yet. The back of the island needs to be covered with a base wainscoting of knotty alder. Also, according to the plan, that wall needs to be 42" in height. This means the owner wants a bar on that side and the counter top will extend out over the island.

So in this pic, we added the wainscoting, raised the wall and extended the bar. We also gave it that arch, just like it appears on the plans. Usually, you'd save any counter top work until the entire kitchen was done, but since we were already working on the island, I decided to just finish it up.
The final task is completing a simple design on each surface. We won't add a bunch of expensive cabinets like garbage pullouts, spice racks, lazy susans, breadboards or utility closets. All base cabinets will be the simple door/drawer combo. We will try to use as few as possible because each additional cabinet increases our bid and right now, we're just preparing for the bid. High end, more expensive cabinets will be discussed when the client has the chance to go over the plans. So we've kept it light, as inexpensive as possible and we've followed the plan as exactly as we were able. Are you ready to see the final result?

Just for fun, I wanted to show the front of the island so you could see the dishwasher, the drawer bank and the sink. These 3D renderings are wonderful because you can program them to do all kinds of things. It can reproduce different stain colors and finishes. It can also show detail like raised panels on doors. There is an element of animation in the rendering, but if you can suspend disbelief, you can very easily see what your kitchen will actually look like when it's installed.

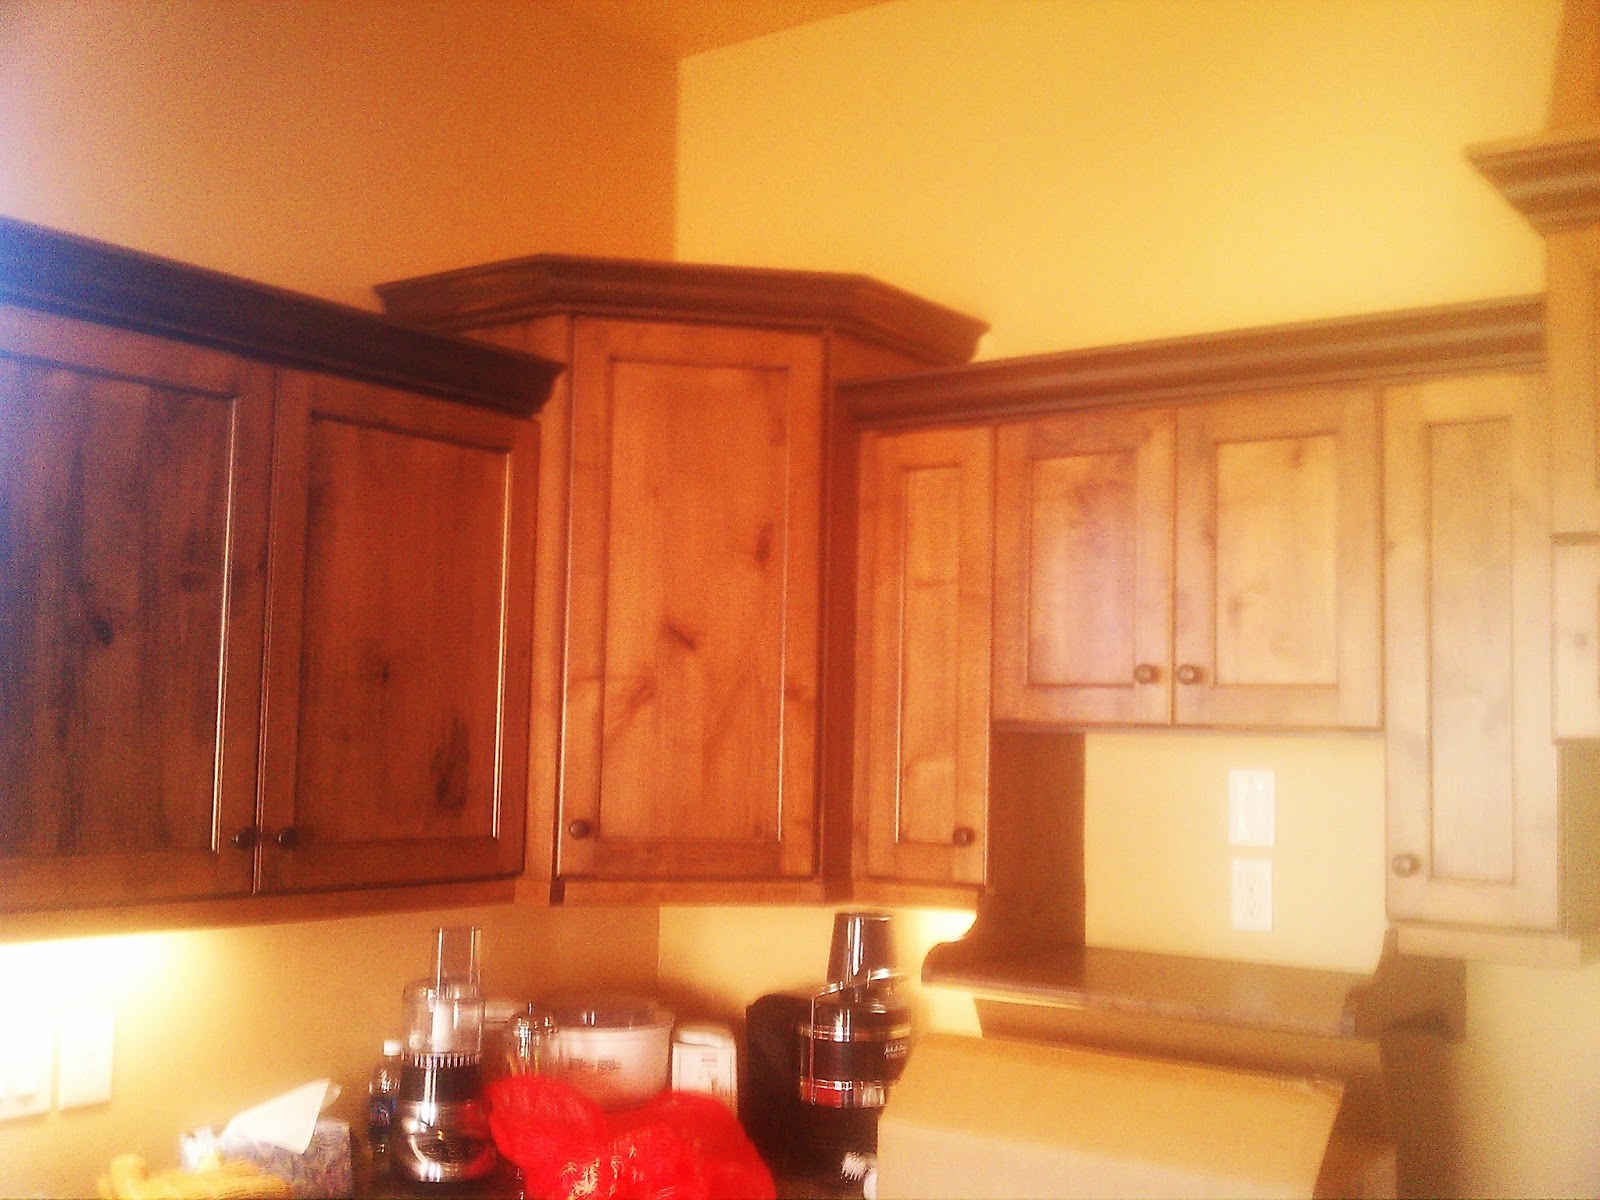
There is one final think I'd like to mention about the 3D rendering and that is how much you can learn from it. Take this pic for example. Sometimes, when you're putting cabinets together, they don't seem to fit. You can see how that might be a problem here. The cabinet over the fridge and the double oven cabinet 25.5" deep while the regular upper cabinets are much more shallow. If I'd not been able to make the cabinets line up and fit nicely together, the crown molding would have returned back to the wall. Instead, it cuts back and then cuts left again when the next cabinet starts. Very clean molding lines means a clean fit for the cabinets in that elevation.
Wow!!! That's basically all there is to it. Some plans can be more difficult than others to design. That usually depends on the architect who designs the space. We've had some plans with angles and patterns... Lots of crazy twists and turns. It does happen, but fortunately, those kinds of plans are few and far between. We do look forward to them though. There's nothing more satisfying than designing a cabinet layout for a tricky space. Especially one the builder/owner likes.
Call Goodwin Mill And Cabinet for your next cabinetry project and let us show you just how amazing cabinetry can be. Happy Holidays from all of us!
Wednesday, May 14, 2014
UNDERSTANDING PRICE VARIATIONS IN CABINET BIDS
Someone recently asked me, "Why are there such big price differences in the [cabinet] bids I've received?". I've given that question a lot of thought and I wish I'd responded more precisely.
I've talked about the competitive building market before, but I'd like to re-address the topic today. Mainly because there are still so many companies out there who are willing to work for virtually nothing just to get a job. There are dozens of shortcuts you can take to minimize the cost on your bid. Like many other areas of construction, the cabinet maker makes money on upgrades. Most will bid the job low and try to catch more money as they sell you finish, design, hinges and drawer upgrades.
The temptation is to buy the cheapest cabinets you can once the bids come in. But it's important to remember, when you buy the cheapest, you're usually also buying the cheapest quality. As far as resale value, Kitchens are the easiest way to insure the best price down the road. However, if you're want to live in your house and don't consider selling it, you should still consider a better quality cabinet as they last longer and you don't want your cabinets splitting apart or feeling rough after you pay for them. Ultimately, going cheap in the short term can cost you big time in the long term.
There are cabinet makers who offer a quality cabinet for a lower price; but again, I want to point out those lower prices usually come attached to lower quality materials. So how do you know if the guy is overcharging you for low end stuff, or keeping his costs down by skimping on the materials?
These are some of the ways you can tell if a cabinet maker is giving you a low quality cabinet.
First, you'll want to see an example of work before you hire them. The eyes are the first line of defense. If it looks run down and bad, chances are; it is. Reach out and touch a finished side of the cabinet, if it feels flat and smooth than the cabinet maker is using a better quality finish. A custom Cabinet maker will almost always use a higher quality material. Pre-manufactured cabinets are produced using thinner materials.
Second, pay attention to the layout. If you're not using a bid service to create a layout for cabinet makers to bid, you'll get a variation in layouts from the different companies you get bids from. Some will design a layout that is functional and makes use of the space provided. A bid from a cabinet maker who is only interested in providing the lowest cost may produce a layout that is cheap, but not practical.
Drawer banks are more expensive than shelf banks. A great way to save money when you're bidding a Kitchen is to cut out the drawers. If your layout is missing drawers, you know their only interest is the price.
Another shortcut cabinet makers will take is minimizing doors. Sometimes a cabinet is too big for one door. The hinge isn't made to support the weight, but one door (even if it's bigger), is cheaper than two. This is an area where you run the risk of having doors falling off their hinges over time.
One of the best ways to get a fair idea of what a cabinet maker really offers is to level the playing field. You can hire a cabinet bidder to design a layout. You go through the process of picking out where you want your drawer banks, and what cabinets you want in different areas. You can also pick out the wood species you want and even decide what kind of finish you want, i.e. stain, glaze, paint...
Now, take the design with all the specifications and collect your bids. With the option of only bidding for what's already been decided, you can gather together a comprehensive idea of which cabinet maker will offer you the best deal. Without taking shortcuts.
Wednesday, January 16, 2013
CANNON FINAL PICS
It's been another busy week at Goodwin Mill And Cabinet. These are some final pics of the Cannon residence. We went by to change some hinges and finishing some punch list items. All of the hinges are now soft close. For those of you who don't know, upgraded soft close hinges gently close your doors and drawers. They take over and finish the job once you've closed it a portion of the way. It also prevents slamming doors or other rough handling. They're pretty cool and I think Cannon's will be happy they decided to upgrade.
The first two photos I will share are both of the library. The first pic shows the bookcase. They've already started filling the shelves, but I love that because you can see how functional and nice the shelves are. The second pic shows the desk we built in and more shelves above in a two piece unit. Put in a small rubber mat and a chair and you'll have an excellent computer area.
These next two pics are both of the guest bathroom. As you can see, there's the vanity and a drawer unit, but there's also a taller cabinet attached to the base units. This shelf unit is probably
for storing towels or even clothes. You could also fill is with tissue or other cleaning products. No matter what you fill it with, it was a great idea and I like the way it creates a step on the counter top.
The next pics I wanna show you are some of the Kitchen photos. I took a lot of pics here, but the lighting was bad and most of them didn't turn out. For example. The first pic I took was of the island. As you can see, it's very dark even with the natural light coming in through the window.
The next photo shows the full kitchen, however, like its counterpart, it's quite dark. Still you can see how much different it is from the previous pics I've shown from this house. Especially the hood.
Here's the center upper. This corner cabinet is an upper lazy susan and you can also see the microwave shelf we added. You get a good view of the uppers on either side of the corner cabinet. You can also see some of the small appliances and boxes already loaded into the kitchen.
This pic shows the cabinet over the refrigerator. The fridge was delivered fits perfectly in the space we built for it. It's very handsome and the accented crown molding helps to bring out the darker colors of the appliances. The fridge cabinet juts out a little more than the rest of the uppers. It's also a little taller. In the case of this kitchen, that helps out a lot with the additional hood top we added. I'll show you that in the next pic.
Originally, the lower part of the hood was all we built. The line was supposed to come out of the wall and into the back of the cabinet. Unfortunately, when we delivered the job, the line was coming down from the ceiling and we needed to produce an additional piece to cover it. We worried that covering the line all the way to the ceiling would through the alignment of the upper cabinets off and create a disproportionate look in the kitchen. Fortunately, this didn't turn out to be the case. The hood top looks quite regal and gives the upper bank a rich appearance.
This photo shows the interior of the Kitchen island. I've got another pic of this unit further on, but I wanted to show the functional cabinets first and the shelf unit afterward. By now, the granite counter top was installed so you can see how it blends with the finish on the cabinets.
Here's the corner below the lazy susan cabinet. To the right you see the stove and to the left, there's the dishwasher. That cabinet directly left of the stove is a spice cabinet. The corner unit is a drawer unit. An interesting location, but one that is aesthetically pleasing.
This bank of lower units is on the east wall. The cabinet furthest right is the sink cabinet and sits next to the dishwasher. The cabinet to the left of it is the trash bin. It's a pull out trash cabinet! These units are so cool.
Here's another addition we did to the Kitchen. They needed a space for the microwave, but it wasn't included in the original plans. We built this open back shelf to hold the microwave.
Here's another pic of the island cabinets. This one sits on the south side of the island and is a basic shelf unit. It's finished on the inside because it sits open and the shelves are also finished. I thought this was a great addition to the look of the island. You don't see open shelf units like this very often, but when you do, they always provide a wonderful variation that helps create a unique look.
These two sets of uppers are to the left of the east window above the sink. Sadly, I wasn't able to get a good shot of them. It was raining on the day I took these. But when I tried to catch the pics, the sun came out and just dazzled the interior of the house.
The final pic from Cannons is the master bathroom. This double sink bank looks amazing with the counter top in place. I love the way the granite and tile came together to create a blended color throughout the entire room.
Last week, Goodwin Mill And Cabinet, also delivered and installed a job in the Dixie Springs area for Rock Solid! For those of you who follow my tweets, you'll know all about this because I tweeted the progress of the job all day.
I also posted some pics of the cabinets after we delivered them on our Facebook page. For the sake of continuity, I decided to post them here as well and give you the chance to see them.
We hauled all the cabinets into the main area adjacent to the Kitchen and set them there first. Then we started moving them into position. The second pic shows the cabinets I'd moved into the master bath. They're set up and ready to be installed.
This final pic shows the upper cabinets in the Kitchen staged and ready to go up. We usually start in a corner and work our way out. But all the uppers are laid out before we set the first one.
So that's about it right now. We're already assembling two more jobs and getting ready to deliver as quickly as possible. We should have another Rock Solid job delivered and installed before the week is out as well as a couple smaller jobs. Goodwin Mill And Cabinet is moving right along, but we've got plenty of time to add your work to our schedule. Call today and set up your appointment to design your cabinet layout! Then, choose Goodwin Mill And Cabinet to build your cabinets! We're ready to go to work!
The first two photos I will share are both of the library. The first pic shows the bookcase. They've already started filling the shelves, but I love that because you can see how functional and nice the shelves are. The second pic shows the desk we built in and more shelves above in a two piece unit. Put in a small rubber mat and a chair and you'll have an excellent computer area.
These next two pics are both of the guest bathroom. As you can see, there's the vanity and a drawer unit, but there's also a taller cabinet attached to the base units. This shelf unit is probably
for storing towels or even clothes. You could also fill is with tissue or other cleaning products. No matter what you fill it with, it was a great idea and I like the way it creates a step on the counter top.
The next pics I wanna show you are some of the Kitchen photos. I took a lot of pics here, but the lighting was bad and most of them didn't turn out. For example. The first pic I took was of the island. As you can see, it's very dark even with the natural light coming in through the window.
The next photo shows the full kitchen, however, like its counterpart, it's quite dark. Still you can see how much different it is from the previous pics I've shown from this house. Especially the hood.
Here's the center upper. This corner cabinet is an upper lazy susan and you can also see the microwave shelf we added. You get a good view of the uppers on either side of the corner cabinet. You can also see some of the small appliances and boxes already loaded into the kitchen.
This pic shows the cabinet over the refrigerator. The fridge was delivered fits perfectly in the space we built for it. It's very handsome and the accented crown molding helps to bring out the darker colors of the appliances. The fridge cabinet juts out a little more than the rest of the uppers. It's also a little taller. In the case of this kitchen, that helps out a lot with the additional hood top we added. I'll show you that in the next pic.
Originally, the lower part of the hood was all we built. The line was supposed to come out of the wall and into the back of the cabinet. Unfortunately, when we delivered the job, the line was coming down from the ceiling and we needed to produce an additional piece to cover it. We worried that covering the line all the way to the ceiling would through the alignment of the upper cabinets off and create a disproportionate look in the kitchen. Fortunately, this didn't turn out to be the case. The hood top looks quite regal and gives the upper bank a rich appearance.
This photo shows the interior of the Kitchen island. I've got another pic of this unit further on, but I wanted to show the functional cabinets first and the shelf unit afterward. By now, the granite counter top was installed so you can see how it blends with the finish on the cabinets.
Here's the corner below the lazy susan cabinet. To the right you see the stove and to the left, there's the dishwasher. That cabinet directly left of the stove is a spice cabinet. The corner unit is a drawer unit. An interesting location, but one that is aesthetically pleasing.
This bank of lower units is on the east wall. The cabinet furthest right is the sink cabinet and sits next to the dishwasher. The cabinet to the left of it is the trash bin. It's a pull out trash cabinet! These units are so cool.
Here's another addition we did to the Kitchen. They needed a space for the microwave, but it wasn't included in the original plans. We built this open back shelf to hold the microwave.
Here's another pic of the island cabinets. This one sits on the south side of the island and is a basic shelf unit. It's finished on the inside because it sits open and the shelves are also finished. I thought this was a great addition to the look of the island. You don't see open shelf units like this very often, but when you do, they always provide a wonderful variation that helps create a unique look.
These two sets of uppers are to the left of the east window above the sink. Sadly, I wasn't able to get a good shot of them. It was raining on the day I took these. But when I tried to catch the pics, the sun came out and just dazzled the interior of the house.
The final pic from Cannons is the master bathroom. This double sink bank looks amazing with the counter top in place. I love the way the granite and tile came together to create a blended color throughout the entire room.
Last week, Goodwin Mill And Cabinet, also delivered and installed a job in the Dixie Springs area for Rock Solid! For those of you who follow my tweets, you'll know all about this because I tweeted the progress of the job all day.
I also posted some pics of the cabinets after we delivered them on our Facebook page. For the sake of continuity, I decided to post them here as well and give you the chance to see them.
We hauled all the cabinets into the main area adjacent to the Kitchen and set them there first. Then we started moving them into position. The second pic shows the cabinets I'd moved into the master bath. They're set up and ready to be installed.

So that's about it right now. We're already assembling two more jobs and getting ready to deliver as quickly as possible. We should have another Rock Solid job delivered and installed before the week is out as well as a couple smaller jobs. Goodwin Mill And Cabinet is moving right along, but we've got plenty of time to add your work to our schedule. Call today and set up your appointment to design your cabinet layout! Then, choose Goodwin Mill And Cabinet to build your cabinets! We're ready to go to work!
Friday, December 21, 2012
McARTHUR HOME PROGRESS
It's another busy day at Goodwin Mill And Cabinet. Yesterday we delivered Rock Solid's Millcreek house and we're cutting our next two jobs out today. The pics I want to show you today are of the last home we did for Jim McArthur. I actually went to school with Jim and it's awesome to see him again after so many years. He's building some great homes in the Green Valley area and Goodwin Mill And Cabinet is proud to be a part of such fine work! I want to do another post on this house when the counter tops are in and I'll show you the whole structure not just the cabinets in progress. The first photo is showing the east wall of the Kitchen and I wanted to show the upper bank. As you can see, there are two double door uppers on both sides and then a range hood. It's a well balanced set up and it looks great too.
The lower banks are similar but not exact. You've got a double drawer and door set to the left of the Range and a drawer bank and single drawer and door set to the right. That piece of wood spanning the Range opening is actually a piece of crown molding we haven't put up yet.
Moving over to the north wall, you have the Fridge opening with a cabinet above and then a two door upper and lower. As you can see, the cabinet above the Fridge space is where the crown molding from the previous pic will fit. You've also probably noticed these doors are flat panels. They look awesome and give the Kitchen a rustic feel. They're made from knotty alder; which also gives it an old fashioned appeal.
Next up is the Laundry or Utility Room. This room has a set of uppers and base units on the north and south sides of an east wall. This first pic shows the southern upper set and if you look at the extreme left, you will see a rod extended out. This rod spans the space taken up by the washer and dryer below and is perfect for hanging clothes.
This photo shows the south end base unit. It's a simple two door shelf piece, but as you will notice in the next photo, it's not as wide as the northern base. This photo also turned out kinda dark.
This is the northern base and you can see the flat panels in the doors much more clearly than in the other. As I mentioned earlier, the washer and dryer will go between these two base units.
This is the northern end upper unit. You can see the rod coming into the cabinet. You'll also notice, it's only a door two shelf unit where the southern cabinet is a three door shelf unit.
This is the master bath. The two vanities are separated by a drawer unit. All of the drawer units have handles while the door cabinets have knobs. I really like the color on the hardware for this job. It looks great and with the different shading in the crown molding, the handles and knobs really stand out.
Back in the Kitchen, I wanted to show a couple more pics of the upper cabinets. I wanted you to see the difference in color between the crown molding and the flat panel doors. Here are the uppers on the east wall again. This time with hardware on .
And here is the north wall with Fridge opening. The crown is on now and so is the hardware. This crown proved a little tricky because the wall it runs into is on an angle. We didn't want the crown to simply end abruptly, so we needed to cut a filler piece and the crown on the angle.
This photo is my attempt to show you the angle cuts. The crown is probably more obvious than the filler piece because it has more definition and you can see the way it angles better. You also get a closer view of the difference between the cabinet color and the crown. I love the blend here. Using a darker crown to accentuate the flat panel doors is a great way to make a simple door design more elegant and pleasing to the eye. It opens up the cabinets to even more blending with the tile floors, counter tops and wall paint. All in all, this Kitchen turned out lovely! And I'm sure the buyers of this house will love the cabinetry as much as we enjoyed making it! If you're interested in the Green Valley area, give Jim McArthur a call. He's doing some amazing work there. As I mentioned earlier, once this property gets done, I'll take more pics and show you the whole house. Until then, don't hesitate to contact Goodwin Mill And Cabinet for any of your woodworking needs! We're also looking forward to bidding and doing your cabinet work! Refacing, remodeling or brand new sets... We can do it all! Give us a call and we'll go to work!
Thursday, December 13, 2012
CANNON HOME DEC 12, 2012 - PROGRESS PICS
It's a busy holiday season at Goodwin Mill And Cabinet. We're working on a home for the Cannon family in the Highlands subdivision of Green Valley. For those of you who aren't familiar with St. George, Green Valley is an area of town well known for its tennis courts and golf courses. It's a beautiful subdivision and the homes are all magnificent. I love it up there and this house is incredible. We watched some of the other subs working on the job and everyone was doing such a fantastic job... This is going to be an incredible home and I can't wait to show you how it looks when it's finished.
These first two pics are the Guest Bath and the Master Bath. Cannons have chosen an Antique Brown color with a flat panel door. This color has a great quality to blend in with colors around it. When I took the pics, both bathrooms were full of natural light and it was hard to keep the pics from turning into bright splotches. Still, both bathrooms were done rather quickly and then it was off to the Kitchen.
The first pic I'm gonna show is the opening where the refrigerator goes. There are two full length finished panels running down both sides with an upper cabinet spanning the two. The fridge will go directly beneath the cabinet. This pic has a more normal light to it and you can see the shading in the wood grain thanks to the antique brown. It dramatically accents the grain to give strong degrees of color variation. That's why this particular glaze is great for matching with other things like granite, tile, paint, etc. etc. It pulls in the light and color around it.
Next to the fridge opening, there is a small upper and then the range hood. This piece is the highest set upper in the entire Kitchen. As you'll see in a future full Kitchen photo, this hood is quite majestic and we may add an additional piece at the top to accommodate the vent coming down from the ceiling.
Next to the hood, you have the remaining uppers for this wall. The two outer cabinets are both fairly thin and the cabinet in between them will have an additional piece hanging down where the microwave will sit. That piece is still being manufactured but we should have it finished and in place quite soon.
The last wall we looked at was the south wall. This is the east wall and as you can clearly see, there is a lot of bright sunshine streaming in during the morning hours. This first pic shows the two uppers on the right side of the window. The window will sit above the sink with upper units on either side.
In this pic, you can see the corner upper and the two uppers that extend over to the window. You can also see Kent Goodwin working on the base units. We were able to install this Kitchen plus the two bathrooms in 7 hours. There is an additional room, but the flooring isn't ready. We'll have to go back and finish that room along with any changes.
This photo shows the base units on the east wall. You can see the sink unit, the space for the dishwasher; plus the other base units. You can also see some of the island in this pic. Well, mostly korbels, but some of the island.
The final photo in this set shows the island from inside the Kitchen. Look at that amazing difference in the appearance just from exposure to light. The middle and right base units look extremely light while the left base looks dark. This is a great finish and it's versatile. I absolutely love it! The Cannon's Kitchen is looking fantastic and I hope to go back when the counter tops are on to get more pics. I can't wait to see what it looks like then.
As always, you know who to call if you need cabinets, a cabinet layout or all sorts of woodworking... Goodwin Mill And Cabinet are your cabinet professionals and we're ready to go to work for you! Call to set up your appointment today!
Subscribe to:
Posts (Atom)